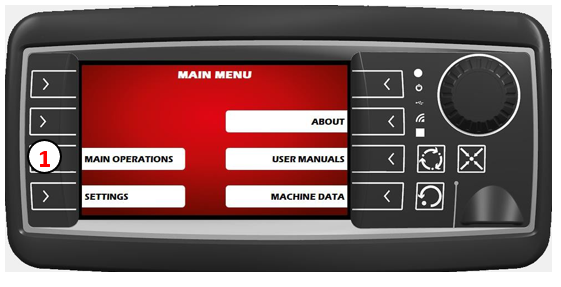
Return to the Main Menu by pressing the Home Button. Then select Main Operations (1).
First Page
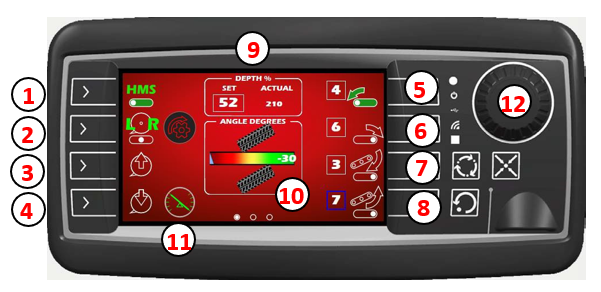
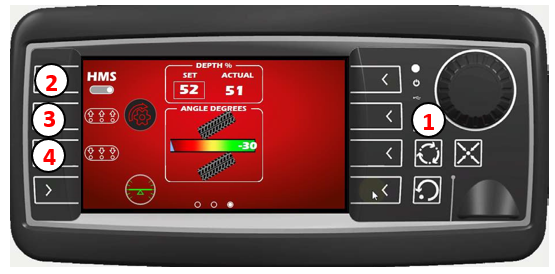
HMS (1): helps you to combine operations in one press of a button. In the HMS page, you can select what functions of the machine you would like to stop, start or reverse when the HMS button is pressed at the start and end of the field. The green light indicates that HMS is activated.
DISCS (2): Choose which disc you want to control by pushing the L-R DISC soft key. When the L is highlighted green, the left disc is selected. When the R is highlighted green, the right is selected. When both are highlighted green, they are both selected.
DISC UP/DOWN (3/4): The selected disc(s) will move up by pushing and holding the DISC UP soft key (3). The discs will move down for 4 seconds when the DISC DOWN soft key (4) is pressed. You cannot change this value. When HMS is activated, the discs will resume to their working position.
CROSS CONVEYOR LEFT / RIGHT (5/6): When the soft key is pressed, and the cross conveyor is highlighted in green, it indicated that the cross conveyor is on. If you want to adjust its speed, turn the dial (12) until the box is blue. Then push the dial inwards, and change the value by rotating the dial again. Another push of the dial will save the settings. Press the soft key again to switch the cross conveyor off. It will no longer be highlighted in green.
SCRUBBER WEB ON/OFF (7/8): To turn the scrubber web clockwise, press the soft key so that it is highlighted green. You can adjust the speed by changing the value in the box. To switch off, press the soft key again and it will no longer be highlighted.
To turn the scrubber web anti-clockwise, press the bottom soft key so that it is highlighted green. The same applies when adjusting the speed. This function is only available with machines equipped with scrubber webs.
DEPTH (9): The depth can be adjusted by navigating the dial until the box is highlighted in blue. Press the dial inwards and then change the value. The ACTUAL depth will change eventually.
WHEEL POSITION (10): The wheel position can be shown on the first page of main operations. To centre the steering, press the button on top of the central joystick.
LEVELLING POSITION (11): The position of the levelling axle can be seen on the first page of main operations. Auto Level can be activated on the second Operations page.
Second Page
Press the Main Operations Button (1) (3 arrows in a circular motion) to navigate to the second and third page.
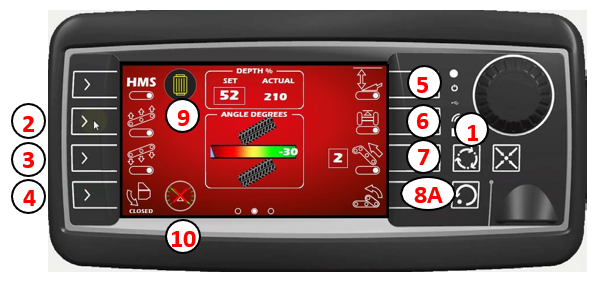
SCRUBBER WEB UP/DOWN (2/3): The scrubber web can be moved upwards or downwards depending on the conditions, by pressing the two appropriate soft keys on the left.
STONE BOX OPEN/CLOSE (4): Press the stone box soft key once to open the stone box. It will open for 6 seconds. You cannot change this value. Pressing the button at any point will stop the automatic opening. Each click and release of the button changes the direction for the next time the button is pressed. To close the stone box, the button must be held.
AUTO DEPTH ON/OFF (5): The auto depth function can only be activated when the machine is equipped with depth control. When highlighted in green, Auto depth will function when HMS is activated. It will be disabled when the share is moved manually with the joystick.
AUTO LEVELLING ON/OFF (6): The auto levelling function can only be activated when the machine is equipped with a levelling axle. When highlighted in green, auto levelling will function when HMS is activated. It will be disabled when the axle is tilted manually with the joystick.
ELEVATOR: CONVEYOR ON/OFF (7): Ensure the elevator is in the working position before turning the elevator conveyor web. When the soft key is pressed, the conveyor web will start to turn. The speed can be adjusted by changing the value in the box. To stop the conveyor web, press the soft key so it is no longer green.
ELEVATOR: UNFOLD (8): To unfold the elevator, hold down the soft key. Each click and release of the button changes the direction for the next time the button is pressed. The elevator does not unfold quickly, to ensure stability of the machine. Once the main part of the elevator is unfolded, the goose neck can be controlled by pressing the right-hand joystick up and down. This will only work once the elevator has been connected in the main settings: See section 6.4.
OIL FILTER (9): When this icon appears, it means the oil filter is clogged and must be replaced.
LEVELLING SENSOR (10): When this icon shows a red cross, the levelling sensor has disconnected and the cables must be checked.
The arrow on the elevator icon (8B) changes depending on whether it is folding or unfolding.
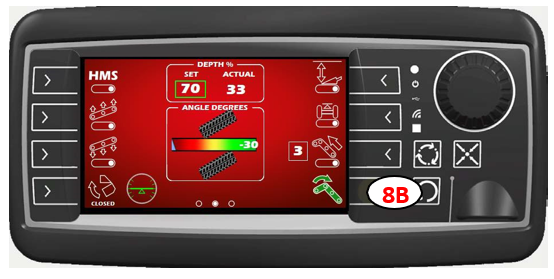
Third Page
Press the Main Operations Button (1) (3 arrows in a circular motion) to navigate to the second and third page.
HMS in Grey (2): If the HMS icon is in grey, it means that it is waiting for a response from the machine. If the colour does not change, turn off the display box with the black button on the left for approximately 3 seconds.
PRESSURE PADS UP/DOWN (3/4): The pressure pads up/down only move when soft keys (3/4) are pressed and held. This function is moved from the third joystick (up/down) when an elevator is connected.